
By Paul Owens
A contributing option writer, product reviewer and professional photographer of 20 years.
It’s the most unusual piece of photography software I’ve reviewed in five years on this beat — and it solves a problem most amateur photographers don’t even realise they have.
That feeling is so common among amateur landscape photographers that I’ve started thinking of it as the defining problem of the genre. You drove three hours. You stood somewhere genuinely beautiful. You pressed the shutter at what you thought was the right moment. And the result is a flat, slightly grey image that looks like every other internet photograph of the same place.
For most of my career, I’ve answered the “why does this happen?” question the same way every other photography reviewer does. I’ve told readers it’s probably a composition issue. Or a lighting issue. Or a settings issue. Or, occasionally — when I really couldn’t figure it out — a “patience and time on the camera” issue.
After three weeks with a piece of software I’d never heard of until last month, I think we’ve all been answering the wrong question.
How this review came about
In late winter, a reader — a retired anaesthetist who’s been picking up a camera in the Cumbrian hills for the better part of a decade — sent me an email I almost deleted.
It said, more or less: “I don’t know why my photos suddenly got better. It wasn’t a new camera. It wasn’t a workshop. It’s a piece of software my photography teacher gave me access to. I think you should look at it.”
Attached were two photos of the same valley, taken eight months apart. The first looked like a perfectly competent amateur landscape shot. The second looked like something a magazine would print. Same camera. Same valley. The difference was striking enough that I followed up.
That’s how I ended up with a login to something called the Photography Explained Toolkit — a private planning tool built by a landscape photographer named Will Barron for the students of his coaching programme. It’s not publicly available. It doesn’t have a marketing website. As far as I can tell, it has never been reviewed in a photography publication before.
I asked for three weeks of access on the condition that I could write about it honestly, whatever I found. They agreed.
What follows is the review.
The problem most amateur landscape photographers don’t know they have
To explain what the Toolkit does, I have to explain the problem it solves — and the problem it solves is one I’ve never seen named clearly in any of the photography books or YouTube channels I’ve covered.
Here it is, as plainly as I can put it:
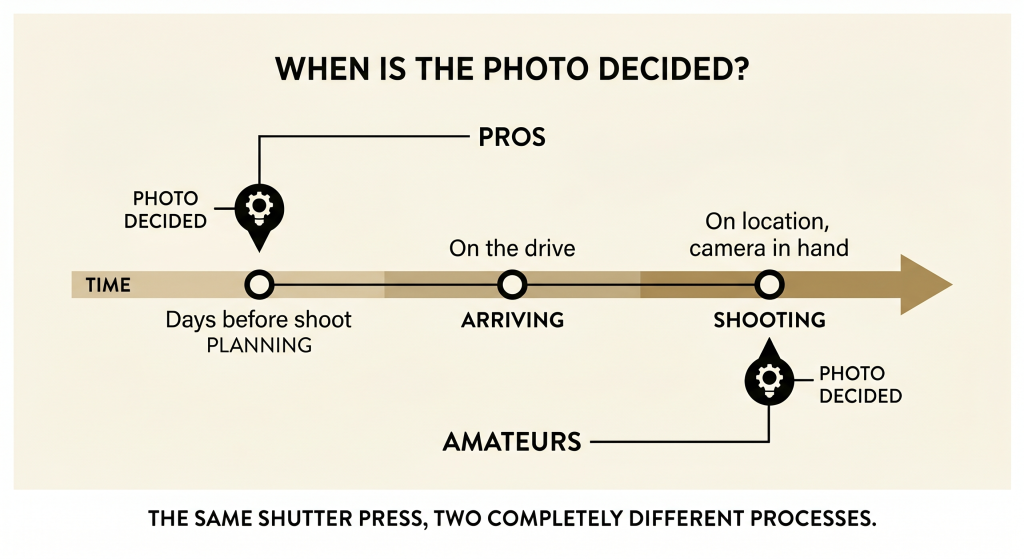
Professional landscape photographers decide their photos before they leave the house. Amateur landscape photographers decide their photos on location, in the moment, with their camera in their hand.
That single difference accounts for almost all of the visible quality gap between professional landscape work and amateur landscape work. Not gear. Not talent. Not editing skill. The decision point.
A working professional doesn’t just rock up to a viewpoint and hope. They’ve already decided, days in advance: I’m going to be at this specific spot, on this specific morning, when the cloud cover is doing this specific thing, with the sun coming from this specific angle. By the time they pull up at the layby in the dark, the photo is essentially already taken. The shutter press is the last 5% of the work.
An amateur, by contrast, drives somewhere on a Saturday morning because the weekend is when they have time. They arrive at whatever hour they arrive. The clouds are doing whatever they’re doing. The sun is wherever it is. And they react, in real time, to a situation that was largely decided by chance.
Same camera. Same location. Different photo.
This is, I now believe, the defining problem of the amateur landscape photographer. And no amount of new gear, no number of YouTube tutorials, and no editing preset on earth will fix it — because the problem is upstream of every single one of those things.
The thing I want to write about today is the first piece of software I’ve seen that takes this problem seriously.
Three things I learned about how landscape photos actually get made
Spending three weeks inside a tool built by working professionals is, it turns out, an education. Below are the three things I learned that fundamentally changed how I think about landscape photography reviews.
Truth #1: A landscape photo is essentially decided before you arrive on location
This is the foundation. Once you accept it, every other tool in your photography life starts to look different.
The reason a professional’s photo looks better than an amateur’s isn’t that the professional has better instincts in the moment. It’s that the professional has already eliminated, in advance, all the locations, days, and times when the photo wasn’t going to work.
Working photographers I’ve interviewed over the years all say variations of the same thing: they shoot maybe one trip in five. The other four, they look at the forecast, look at the wind, look at where the clouds are forming, and decide it’s not worth going out. They’re ruthlessly selective about *when* to press the shutter.
Amateur photographers don’t think this way, because amateur photography time is scarce and weekend-shaped. If you only get out once a fortnight, you go out whenever you can — regardless of conditions.
And that single behavioural difference is, I think, responsible for somewhere between 60% and 80% of the visible quality gap between the two groups.
Truth #2: ‘Pre-shoot’ planning is impossible without a tool that compresses 6+ data sources into one decision
So why don’t amateurs just plan their shoots like professionals do?
Because the planning is genuinely hard. To pre-decide a landscape photo properly, you need to know — for a specific location, on a specific day, at a specific minute — at least the following six things:
- What the cloud cover is going to be at three different altitudes (low, mid, high) — because only one of those three actually catches golden light
- Whether the horizon between you and the sun will be clear, or blocked by a wall of distant weather you can’t see from your viewpoint
- The exact azimuth and altitude of the sun at the minute you’re planning to shoot — and whether the local terrain will block it
- Whether the wind is going to make a tripod usable or unusable
- Whether the rain in the forecast will be ending right at golden hour (a high-value condition) or starting right at golden hour (a write-off)
- Whether the major weather models even agree with each other on any of the above — or whether the forecast is volatile enough that it shouldn’t be trusted
There’s no consumer weather app on earth that surfaces any of this. The BBC weather app tells you whether you’ll get rained on. It doesn’t tell you whether the rain ends 20 minutes before sunrise. It doesn’t tell you whether the cloud at golden hour will be at the right altitude to catch light. It doesn’t tell you whether ECMWF and GFS disagree about Tuesday.
To get this information today, an amateur photographer has to manually pull data from at least four different sources, mentally combine them, and apply a layer of professional judgement they probably don’t yet have. It’s the kind of work that takes a decade of trial and error to develop instinct for.
This is the gap the Toolkit closes. It pulls all six data layers together, applies a professional photographer’s judgement to them automatically, and gives you a single 0–100 score for each of the next seven days — with a written briefing explaining why.
Truth #3: A general weather forecast is useless. You need a forecast for *your specific composition*
This was the part of the review that genuinely changed my mind about what photography software can do.
Even if you somehow had access to all six of those data layers — even if you could read them — there’s one more problem. Weather data is reported as an average over a wide area. It tells you, roughly, what the sky is doing across a 5-kilometre region.
That’s not specific enough for a landscape photo.
If you’re standing on a viewpoint looking east at a mountain three kilometres away, the only weather that matters to your photo is the weather *between you and the mountain*, plus the weather *behind the mountain* (where the dramatic light will actually be coming from). The weather on the other side of the valley, behind you, doesn’t enter the picture.
No general forecast in the world distinguishes between these two zones. They report the average. The average is wrong for photography.
This is, more than anything else, what convinced me the Toolkit was a serious piece of software.
What it actually does, feature by feature
Three weeks of testing isn’t enough to write a complete review of a tool this dense, but it’s enough to identify the three components that genuinely solve the planning problem. I’ll cover them in order.
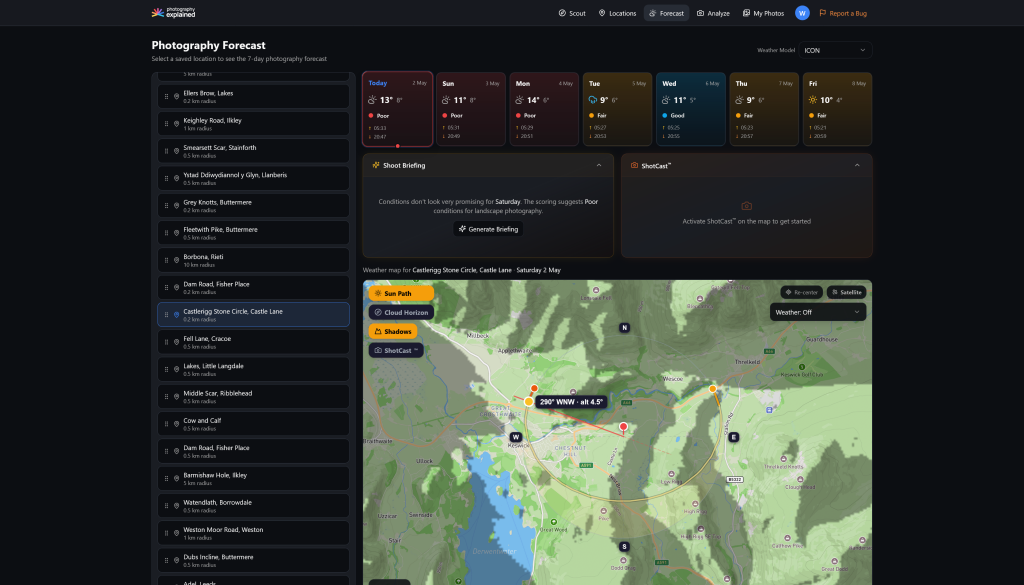
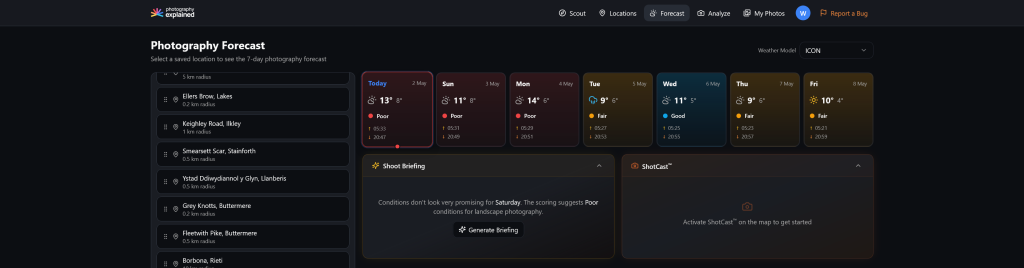
1. The 7-Day Photography Forecast
This is the tab I spent the most time in. You select one of your saved locations and the tool returns a seven-day forecast scored specifically for sunrise and sunset shooting at that exact spot.
Each day is graded on a 0–100 scale. The scoring isn’t a black box — the tool shows you the breakdown.
Cloud Quality (max 40 points): How likely is the sky to have the kind of overhead low/mid clouds that catch warm light? Total overcast and empty blue sky both score badly. The tool wants the kind of cloud that turns gold at sunrise.
Horizon Clarity (max 40 points): The tool samples 32 points along the geometric horizon in the direction of the sun and asks, in effect: will the light actually reach this location, or is there going to be a wall of weather between the sun and the clouds above me? Most amateur photographers have never thought about this question. After three weeks with the tool, I now think about it constantly.
Wind (max 20 points): Light wind preferred. High wind heavily penalised — both for camera shake and tripod safety.
The score for each day is the higher of sunrise vs sunset, so the tool is also implicitly recommending which side of the day to shoot.
There’s one detail in the forecast I want to call out specifically. On certain days, an amber “Clearing” badge appears in the corner of a card. This indicates that the model predicts rain ending in the 30 minutes immediately before golden hour.
This is — and any working landscape photographer will tell you the same — the single highest-value condition in landscape photography. Rain clearing right before golden hour produces the dramatic, atmospheric, golden-against-stormy light that wins competitions. Most amateur photographers either don’t know this is a condition to look for, or have no way to detect it in advance.
The Toolkit detects it automatically and flags it before the day arrives. I found this single feature, on its own, more useful than the entire output of every general weather app I’ve ever used for photography.
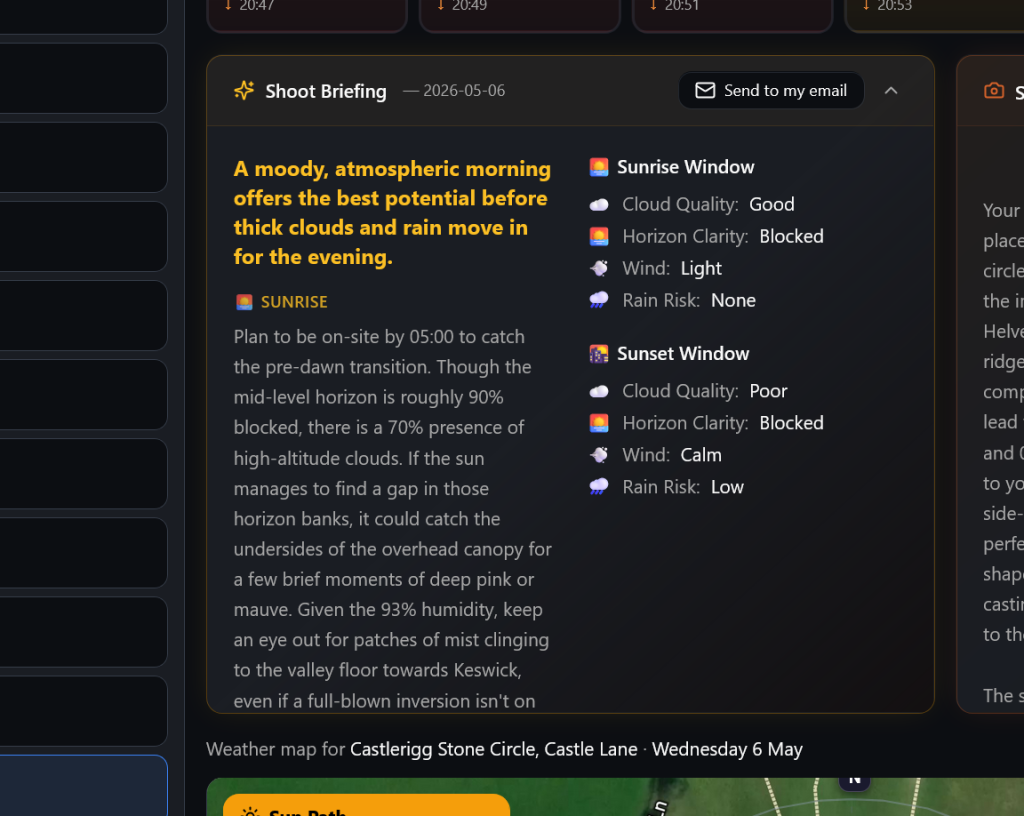
2. The Shoot Briefing
If the 7-day score answers “which day?”, the Shoot Briefing answers “why?”
Click into any day and the tool generates a written briefing — three or four short paragraphs of plain-English analysis written from the perspective of an experienced landscape photographer. Not a generic weather summary. A landscape photographer’s read on the conditions.
On a typical briefing, you’ll get something like: the cloud cover is going to be best at mid-altitude and overhead, which is what you want; the horizon to the east is mostly clear so the light has a path through; the wind drops below 10 km/h around 30 minutes before sunrise so the tripod will be safe; sunrise is the better window today because the sun is rising into clear sky behind a wall of overhead cloud.
It’s a paragraph of professional photography judgement. It is, as far as I can tell, the only piece of photography software I’ve ever seen that produces output like this — the kind of analysis you’d normally only get from standing next to a working professional and asking them what they’re seeing.
More than anything else in the Toolkit, the briefing is the part that taught me something. After two weeks of reading these briefings every morning, I noticed I was starting to read forecasts the same way the tool reads them — even when I wasn’t logged in. The briefing is, in effect, a teaching tool disguised as a planning tool.
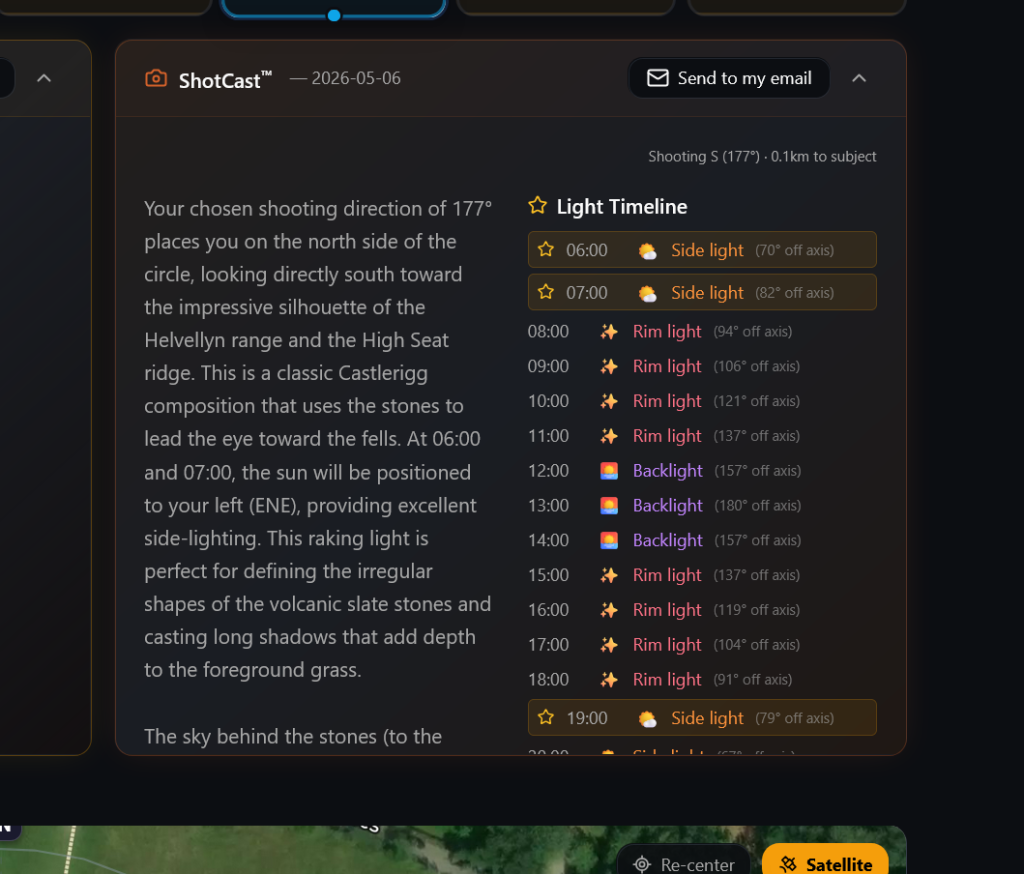
3. ShotCast — the part of the tool I have never seen anywhere else
What ShotCast does
You drop two pins on the map: one where you’ll be standing, one on the subject you’re shooting. The tool then samples the weather at four points along the shot line between you, and at six points fanned behind your subject — where the dramatic light will actually be coming from. It returns a directional forecast for that specific composition.
This is the feature that, in three weeks of testing, I came to believe is the most important single innovation in the Toolkit.
Remember Truth #3 — that a general weather forecast is useless because it averages conditions over too wide an area. ShotCast is the answer to that problem.
I tested ShotCast against my own intuition four times during the review period. On three of those four occasions, the tool predicted a meaningful difference between the conditions in front of me and the conditions behind my subject — a difference my own reading of the forecast had missed. On one occasion, the tool told me the cloud behind my subject was going to thin out 45 minutes before sunset, even though the cloud over my own position was holding solid. I drove out anyway, sceptical. The cloud thinned exactly when the tool said it would. The shot worked.
On the fourth occasion, my intuition and the tool agreed. The shot also worked.
Four for four is not a sample size, and I’ll be testing it more in the coming months. But I will say this: I have not seen another piece of photography software that even attempts to do this. Most tools tell you whether the weather is good. ShotCast tells you whether the weather is good *for the composition you are about to take*. The distinction is enormous.
Other features I noticed but won’t cover in depth
There are several other components I tested but won’t spend much time on, because they’re competently executed but less unusual. The location scouting tab pulls Flickr photos around any spot you search — useful for getting a sense of what’s actually been photographed there. There’s a saved-locations system with folders and notes, which is well thought through. There’s a photo critique tool that runs uploaded images through a structured AI review — I tested it on a dozen of my own photos and the feedback was sharper than I expected, though it’s a different kind of feature from what I’ve been describing here.
None of these are the reason to use the Toolkit. The reason to use the Toolkit is the three components I’ve covered above.
What I noticed about the photographers who already have access
During the review period I was given access to the private community where the Toolkit’s users post their work. I scrolled through several months of it before writing this piece.
Two patterns stood out.
First, the work is unusually consistent. In most online photography communities, you scroll for a while and you see one good photo for every ten mediocre ones. In this community, the ratio was inverted. Most posts were good. A surprising number were genuinely excellent. That alone is worth noting.
Second, the demographic skews older than I expected. The community is largely photographers in their late fifties, sixties, and seventies — retirees, semi-retirees, professionals winding down from other careers. Photographers, in other words, with the time to actually plan a shoot properly, but not necessarily the decade of trial and error required to develop the planning instincts on their own.
This is, I think, the demographic the Toolkit is genuinely built for. It collapses ten years of pattern-recognition into something a serious amateur can use on a Tuesday morning before deciding whether to drive to the lakes.
How to actually get access to it
This is where the review gets unusual.
The Toolkit is not, at the time of writing, available to buy on its own. It has no consumer landing page. You can’t sign up for a free trial. There is no monthly subscription option.
It’s currently bundled — and only available — to students enrolled in Will Barron’s 8-week landscape photography programme, which runs as a small live cohort twice a year. From what I can tell, this isn’t a marketing decision. The Toolkit is genuinely built as a teaching companion. Several of the planning frameworks the cohort teaches reference specific features inside the Toolkit. They were designed together.
That means, somewhat unusually for a software review, the only way I can point readers towards getting access to the Toolkit is to point them at the cohort that includes it.
I asked Barron whether this was likely to change — whether the Toolkit might be released as a standalone product at some point. His answer was honest: probably eventually, but not soon, because the planning system the Toolkit embodies is still being refined based on cohort feedback. For now, access comes with the programme or not at all.
The programme runs twice a year and the cohort sizes are small — Barron reviews each student’s work weekly, which puts a hard cap on enrolment. The next intake is open now, with a limited number of places remaining.
Who I’d recommend this to
- Photographers who keep coming home from beautiful locations with photos that feel flat — and have started to suspect the problem isn’t their gear
- Photographers in their fifties and beyond who have the time to plan a shoot properly but want a tool that compresses the years of pattern-recognition required to plan well
- Photographers who are willing to be selective about when they go out, rather than going out whenever the weekend permits
- Photographers who want to learn to read forecasts the way working pros read them, not just buy a tool that does it for them
Who I’d steer away from
- Photographers who think the answer to their photos is the next lens or camera body. The Toolkit will not help you — your premise is wrong
- Photographers who only get out once a month and need every shoot to count regardless of conditions. Pre-shoot planning works by being selective. If you can’t be selective, the tool can’t help
- Wildlife, astro, or studio specialists. The Toolkit is built for daylight landscape work specifically
- Anyone allergic to a slight learning curve. The forecast scoring takes a few sessions to read fluently
Final verdict, after three weeks
This is the most unusual piece of photography software I’ve reviewed in five years on this beat — and it’s one of maybe three tools I’ve recommended without reservation in that time.
It’s not a perfect product. The interface has rough edges. The data is genuinely complex and the learning curve is real. There are moments when you want a feature the tool doesn’t yet have. None of that matters.
What matters is that the Toolkit is the first piece of software I’ve seen that takes the actual problem of amateur landscape photography seriously. The problem is not gear. The problem is not technique. The problem is that the photo is decided before the camera comes out, and almost no amateur photographer has the tools or the practice to make that decision well.
The Toolkit gives you those tools. The cohort it comes bundled with teaches you the practice. Three weeks in, I think this is the only legitimate route I’ve ever seen for a serious amateur to close the planning gap with working professionals.
If the description in this review sounds like the gap you’ve been trying to close, the cohort link is below. The Toolkit comes with it.
— Paul Owens: A contributing option writer, product reviewer and professional photographer of 20 years.